- I would like to have a mobile workstation for my laptop, i usually change place while working.. living room, backyard.. etc (still in my home)
- Making the robot available to Indonesian language is better.
- I don't watch TV so much but I would like to have recent news from selected RSS internet feed
- Communicating with people.. i mean telephony system in my robot.. i can perform calls from my laptop and vice versa.
- I want to check email.. and someone read it for me.
- Browsing the internet by voice or virtual touch (without mouse?)
- Entertaing robot..
- I have music clips or movie clips that i like to see many times. (building database and a navigation menu for search)
- I shared my laptop with my wife, and some other people.. so i cannot close the laptop for only one software. maybe other people can use the system too..
- Video capture
- I love music and love playing drums.. i want to have a recording station while jamming with my friends.
- Chatting with the robot would be nice
- Should be relatively cheap.. =)
- I like to have a menu system for my robot
- The robot should have a brain for navigating my house.
- The robot can recognize face and objects..
- Home controlled by robot.. this is good
- Robot Emotions? Leaf have that
- The robot can take or bring me something... (i think it's very hard)
- This one is really deep.. i want to ride my robot. transportation in my neigborhood maybe?? (last priority :) )
Updated Robot WishList
PCB Design Error
1. Posisi Terminal tidak lega.
posisi terminal yang miring tidak membuat pemasangan kabel menjadi mudah, melainkan cukup menyulitkan.
Buat terminal di pinggir dan lubang menghadap luar
2. Jalur bisa dibuat lebih besar.
Sepertinya saya memakai 0.5 sebagai lebar jalur. Bisa gunakan 0.7 / 0.8
Flash Arduino UNO / MEGA menjadi device MIDI
Langkah berikut untuk flashing arduino
Saya menggunakan arduino mega 2560 dari DFROBOT bisa dibeli disini
1. download dfu-programmer / unzip di harddisk anda download disini
2. download hex yang sudah dicompile download disini
3. Connect Arduino ke computer via USB
4. reset Arduino dengan menghubungkan 2 solderan ini (pin)
5. Nanti Arduino mereset dan setelah connect kembali dia menjadi ARDUINO DFU
6. PENTING: Install driver windows dfu dengan mengarahkan ke directori dfu yang telah didownload
7. Jalankan langkah ini:
dfu-programmer at90usb82 erase
dfu-programmer at90usb82 flash Arduino-usbmidi-0.2-mega2560.hex
dfu-programmer at90usb82 reset
8. Lepas USB dan Connect kembali.
Anda tidak bisa mengupload sketch apabila sudah memasang ini. Upload implementasi anda sebelumnya.
atau mereflash kembali ke MEGA-dfu_and_usbserial_combined.hex yang ada di directory
arduino-1.0.5\hardware\arduino\firmwares\atmegaxxu2
Semoga Berhasil.
Tambahan Installasi melengkapi Chippy
sudo apt-get install psmisc
sudo apt-get install python-espeak python-serial
sudo pip install npyscreen
sudo apt-get install chrony
Cwiid(Wiimote untuk Python)
sudo apt-get install libcwiid1 lswm wmgui wminput
sudo apt-get install python-cwiid
sudo apt-get install lame ubuntu-restricted-extras
Tank Tread – Jalan lebih lancar
Mau mobil remote control berjalan lebih lancar di permukaan yang tidak rata? berikan rantai tank.
Ini ada url yang suka saya pelajari.
Docking robot
Beberapa hari yang lalu saya teringat soal web yang membahas docking, ini ternyata ketemu lagi.
lumayan buat memperhatikan implementasi.
http://www.schursastrophotography.com/robotics/dockinglogic.html
Arduino interface ke CMPS03 Davantech
#include <Wire.h>
/*
CMPS03 compass reader
language: Wiring/Arduino
Reads data from a Devantech CMP03 compass sensor.
Sensor connections:
SDA - Analog pin 4
SCL - Analog pin 5
created 5 Mar. 2007
by Tom Igoe
*/
// include Wire library to read and write I2C commands:
// the commands needed for the SRF sensors:
#define sensorAddress 0x60
// this is the memory register in the sensor that contains the result:
#define resultRegister 0x02
void setup()
{
// start the I2C bus
Wire.begin();
// open the serial port:
Serial.begin(9600);
}
void loop()
{
// send the command to read the result in inches:
setRegister(sensorAddress, resultRegister);
// read the result:
int bearing = readData(sensorAddress, 2);
// print it:
Serial.print("bearing: ");
Serial.print(bearing/10);
Serial.println(" degrees");
// wait before next reading:
delay(70);
}
/*
setRegister() tells the SRF sensor to change the address pointer position
*/
void setRegister(int address, int thisRegister) {
// start I2C transmission:
Wire.beginTransmission(address);
// send address to read from:
Wire.send(thisRegister);
// end I2C transmission:
Wire.endTransmission();
}
/*
readData() returns a result from the SRF sensor
*/
int readData(int address, int numBytes) {
int result = 0; // the result is two bytes long
// send I2C request for data:
Wire.requestFrom(address, numBytes);
// wait for two bytes to return:
while (Wire.available() < 2 ) {
// wait for result
}
// read the two bytes, and combine them into one int:
result = Wire.receive() * 256;
result = result + Wire.receive();
// return the result:
return result;
}
Remote Control - IrDa vs Serial
Saya punya laptop yang mempunyai Irda Infrared. Di IBM Thinkpad saya di kenal sebagai IBM Thinkpad Fast Infrared Port - Jarang saya memakainya karena modem ataupun Internet menggunakan port USB. Jadi hampir bisa di bilang, port itu nganggur. Lalu saya browsing2 cari informasi tambahan. Gimana caranya menggunakan port itu menjadi serial infrared port, supaya bisa dipergunakan sebagai infrared receiver.
Ada program-program yang menarik seperti.
uIce - http://www.mediatexx.com/ Menggunakan Remote TV sebagai remote control computer.
pcremotecontrol - http://www.pcremotecontrol.com/
Sayang keduanya shareware. Tapi yang tidak kalah menarik.
http://winlirc.sourceforge.net/
yang terakhir ini opensource freeware jadi bisa di utak atik biar jadi lebih oke.
nah hack ini melibatkan perubahan pada file MSPORTS.inf
agar menipu driver menggunakan port serial.
ini linknya. http://forum.thinkpads.com/viewtopic.php?t=19107
Akhirnya berhasil dengan menggunakan Com2 - di laptop saya.
Lumayan dengan konfigurasi-konfigurasi beberapa step, windows bisa saya kontrol menggunakan remote bekas vcd saya yang jadul.
Tips saya: gunakan baud rendah 1200 cocok untuk lingkungan saya. sisanya gunakan default saja.
Dari sini saya mulai mencari port apalagi yang bisa di modifikasi.
Ciao.
Leaf project - back from roaming
This is my first attempt to bring my robot outside the "robot room", i guide him by webserver from roborealm by another desktop computer. It's fun and it's like flight simulator...
at this stage there are no sensors.
i'm using 2 webcams (one is build in the laptop, and the other is logitech cam, on the top of the pole)
This is him coming back from roaming.
This is the interface for remoting the robot.
Did you see the rope around the laptop.. i still cannot find a decent bracket to attach my laptop to the robot.. the rope is the safety belt now..
Leaf project - another bot life
After reading Dr. Bruce www.leafproject.org and playing along with the LISP... it's very inspiring... I decide to make my own leaf robot. Excuse me for the bad english in this site, but i will try to make this in 2 languages. English and Indonesian. This robotic thing is far from my expertice but i really want to build a robot. So this is my shared experience.
So many thought and dreams so .. First one.. my short term GOALS by priority.
- I would like to have a mobile workstation for my laptop, i usually change place while working.. living room, backyard.. etc (still in my home)
- Making the robot available to Indonesian language is better.
- I don't watch TV so much but I would like to have recent news from selected RSS internet feed
- Communicating with people.. i mean telephony system in my robot.. i can perform calls from my laptop and vice versa.
- I want to check email.. and someone read it for me.
- Browsing the internet by voice or virtual touch (without mouse?)
- Entertaing robot..
- I have music clips or movie clips that i like to see many times. (building database and a navigation menu for search)
- I shared my laptop with my wife, and some other people.. so i cannot close the laptop for only one software. maybe other people can use the system too..
- Video capture
- I love music and love playing drums.. i want to have a recording station while jamming with my friends.
- Chatting with the robot would be nice
- Should be relatively cheap.. =)
- I like to have a menu system for my robot
- The robot should have a brain for navigating my house.
- The robot can recognize face and objects..
- Home controlled by robot.. this is good
- Robot Emotions? Leaf have that
- The robot can take or bring me something... (i think it's very hard)
- This one is really deep.. i want to ride my robot. transportation in my neigborhood maybe?? (last priority :) )
First step.. the body construction.
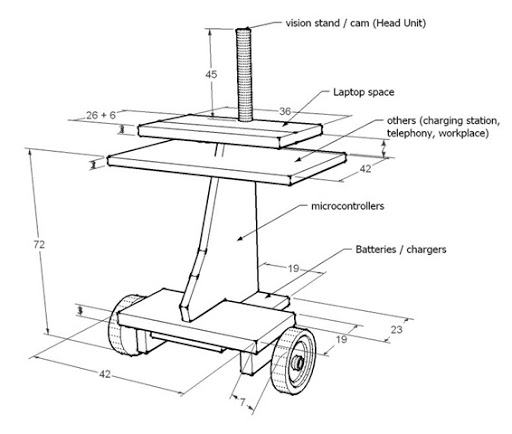
my first robot was the BoeBot from Parallax that's where i understand a little bit about robot.. so i know a little bit about differential drive.. base on that, i sketch a new frame for my little boebot.
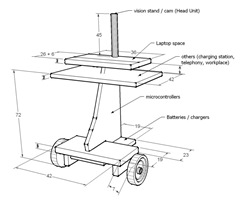
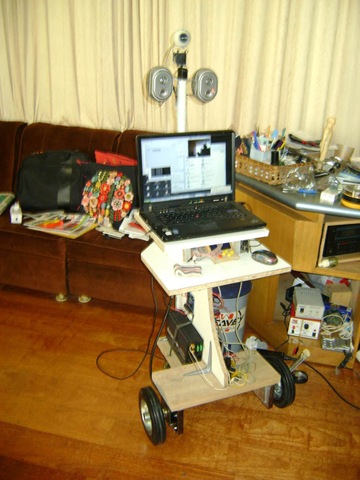
like a table with wheels right?.. i think this is the basic need for my robot.. i hope i can improve the design next time. but this should cover my need right now.
Finding the motors.. after browsing in the internet and real shop in my country.. i cannot get a decent motor to use for my robot without spending too much for this experiment.. so i went to a flea market.. and found a couple DC motors for the Power Window in cars (used). i can get them for approx $15 for two motors. (Rp. 150.000)
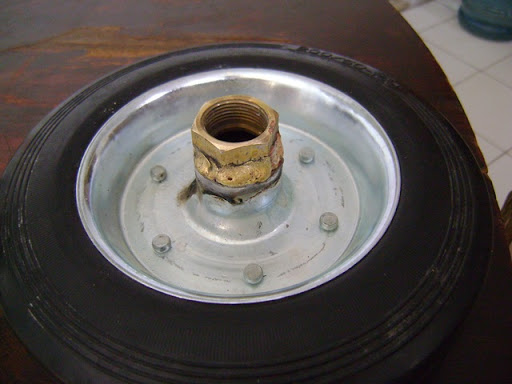
and the wheels i spend $9 (two wheels 20 cm and one smaller one)
for connecting the wheels to the motor i buy a matching plumbing bolt and then i weld them for $5. This is the final result.
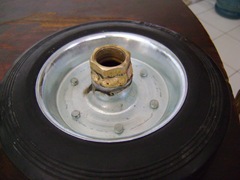
and this is the motors..and the base construction
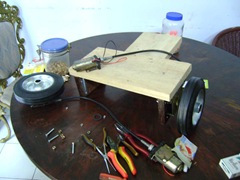
putting together is like this.
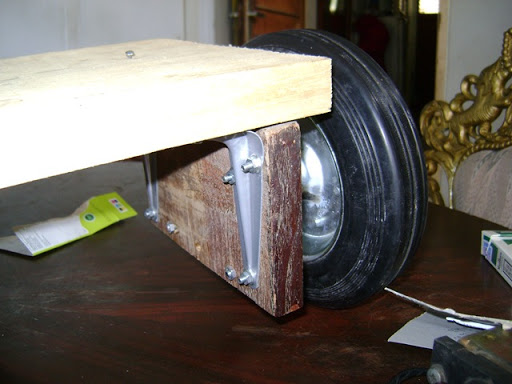
finally mounting the wheels on the base. using some L shaped bracket.
I take all the woods from my used kitchen set.. i think this is the fastest way to build a construction and very flexible..
maybe i upgrade to aluminium frame next time .. or fiberglass. Now.. just wood.
i pick this H-bridge, apparently this is the only model i can find in my country.. it's expensive for this experiment but it was worthed, i buy 2 of this. $27 for each (Rp. 270.000) it's a 30Amp H-bridge.. i think i can still use this when upgrading my motors
First run test..
I have 2 basic stamp board (one original and the other one is indonesian version of basic stamp) and one DT-51 Minimum System v.3.3 board, this is from my previous learning the basic of robotics.. i decide to put them all in my robots. I have also eb500 (a bluetooth module), The basic stamp is easy for prototyping so i decide to put one basic stamp with eb500 as a master controlling other microcontroller.
I learn connecting them by reading this.
ok.. then i build the rest of the frame.. it's like this.
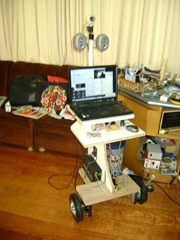
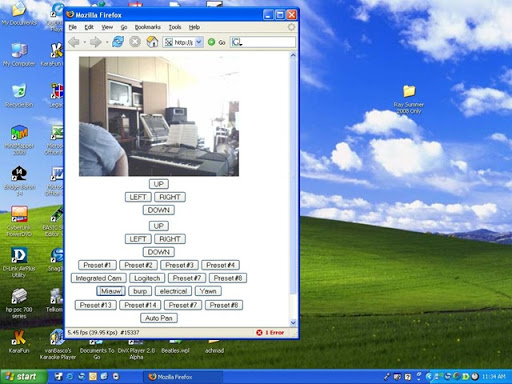
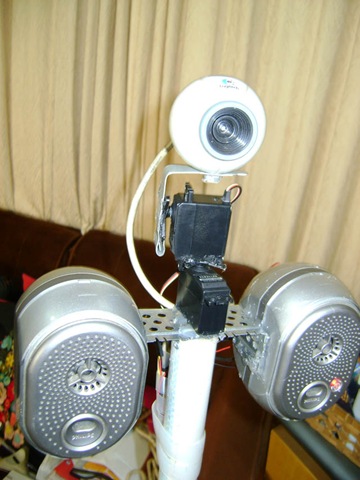
i add speakers and webcam on the top of the pole. using hot glue gun.. i think it will stick.
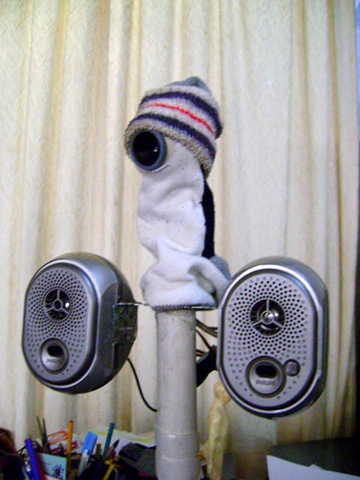
i use the old servo from boebot for the webcam for the pan and tilt. again, using L shaped bracked with the hot glue gun.. i put them together like this.
covered with some cutted socks.. it looks more funky.. =)
That's all for now, next time i will write about the software building for this project.